WordPress stands as a versatile and user-friendly content management system (CMS), empowering website proprietors with the ability to effortlessly forge and oversee their digital footprints. An indispensable facet of web navigation involves the artful creation of submenus, a boon for content organization and the augmentation of user satisfaction. Within this meticulous guide, we shall escort you through the intricate dance of incorporating a submenu into your WordPress realm, thereby elevating the architecture of your website and fortifying its user-friendliness.
Creating Well-Structured Submenus in WordPress
Enhancing the user journey on a WordPress site, particularly those rich in content or in need of categorization, can be effectively achieved by integrating submenus. These submenus not only streamline the navigation process but also contribute significantly to a more organized and user-friendly website experience. The following outlines the advantages and methodologies for developing efficient submenus in WordPress:
Strategic Content Organization:
- Purposeful Grouping: Align related content, such as pages or posts, under a primary menu item. This clustering aids in creating a coherent structure, allowing users to navigate through topics or categories with ease;
- Tips for Effective Grouping: Ensure that each submenu is logically connected to its main menu item. Avoid overcrowding; having too many items can confuse users. Aim for a balance between comprehensiveness and simplicity.
Dynamic Dropdown Menus:
- Visual Appeal and Accessibility: Design dropdown menus that are not only visually appealing but also intuitive. They should reveal additional navigation options when users hover or click on a main menu item;
- Recommendations for Dropdowns: Use clear and concise labels. Consider adding icons for a more visually engaging experience. Ensure that the dropdown menus are responsive and accessible on all devices.
Enhancing User Experience:
- Simplified Navigation for Complex Sites: For websites with extensive content, submenus make it easier for visitors to find specific information without feeling overwhelmed;
- Insights for Improved UX: Test the submenu structure with real users to gather feedback. Adjust the layout and content based on user interaction patterns. Make sure that the submenus are consistent in style and behavior across the entire site.
Creating a Submenu in WordPress: A Comprehensive Guide
Navigating to the WordPress Dashboard
To begin the process of adding a submenu in WordPress, start by accessing the administrator panel. This is achievable by entering your unique username and password. It’s essential to have either administrator or editor rights, as these roles are required for making changes to the website’s menus.
Accessing the Menus Management Area
- After successfully logging in, locate the “Appearance” tab in the left-hand sidebar. This section is crucial for various site customizations, including theme settings and menu configurations;
- Clicking on “Menus” within the Appearance tab will redirect you to the menu management interface. This area is pivotal for creating and organizing the site’s navigation structure;
- Here, you’ll find tools for adding, rearranging, and deleting menu items, enabling you to craft a user-friendly and effective navigation system.
Recommendations and Tips for Menu Customization
- Keep the menu structure intuitive and straightforward. Avoid overcrowding the menu with too many items, as this can overwhelm visitors;
- Consider the importance of each menu item. Prioritize essential pages like ‘Home,’ ‘About Us,’ and ‘Contact’ for easy accessibility;
- Use submenu items to categorize related pages under a common header, enhancing the site’s organization and user experience;
- Test the menu on various devices to ensure it’s responsive and user-friendly across desktops, tablets, and smartphones.
Expanding Your WordPress Skills
- Experiment with different menu styles and formats to see what best suits your site’s design and audience preferences;
- Familiarize yourself with WordPress plugins that can enhance menu functionality, such as mega menus or mobile-responsive menus;
- Stay updated with the latest WordPress updates and trends to continuously improve your site’s navigation and overall design.
Choosing the Appropriate Menu for Modification
When dealing with a variety of menus, the first task is to pinpoint the specific menu that requires the addition of a submenu. This is accomplished by navigating to the designated dropdown menu, typically labeled “Select a menu to edit”. Here, the user should carefully select from the available list of menus, ensuring they pick the one intended for modification. It’s important to double-check this selection to avoid any unintended changes to the wrong menu.
Key Considerations:
- Review All Options: Take a moment to review all available menus in the dropdown to avoid confusion;
- Confirm Your Selection: Double-check your choice to ensure you’re editing the correct menu.
Integrating a New Menu Item for Submenu Creation
The creation of a submenu hinges on the existence of a parent menu item. Users can either opt for an existing item within their selected menu or forge a new one. This step involves utilizing the tools located on the left-hand side of the Menus page. Once the user has either picked an existing menu item or created a new one, they should proceed to incorporate it into the menu by clicking on the “Add to Menu” button.
Strategies for Effective Menu Item Addition:
- Clear Identification of Parent Item: Determine whether an existing menu item can serve as the parent or if a new one needs to be created;
- Utilize Creation Tools Wisely: Familiarize yourself with the menu creation tools on the left-hand side for a smooth process;
- Finalize with Confirmation: After adding the new item, review the menu to ensure the structure aligns with your intended design.
Additional Tips:
- Plan Your Menu Structure: Before adding new items, sketch out a rough structure of how you want your menu and submenu to appear;
- Keep It Organized: Aim for a logical and user-friendly structure that enhances the overall navigation experience;
- Test for Functionality: After making changes, navigate through the menu as a user would to check for ease of use and functionality.
Creating a Submenu in Your Website Menu
Creating a submenu in your website’s navigation is a straightforward process that enhances user experience by organizing content hierarchically. Here’s how you can achieve this:
- Identifying the Parent Menu Item: First, locate the parent menu item under which the submenu will be nested;
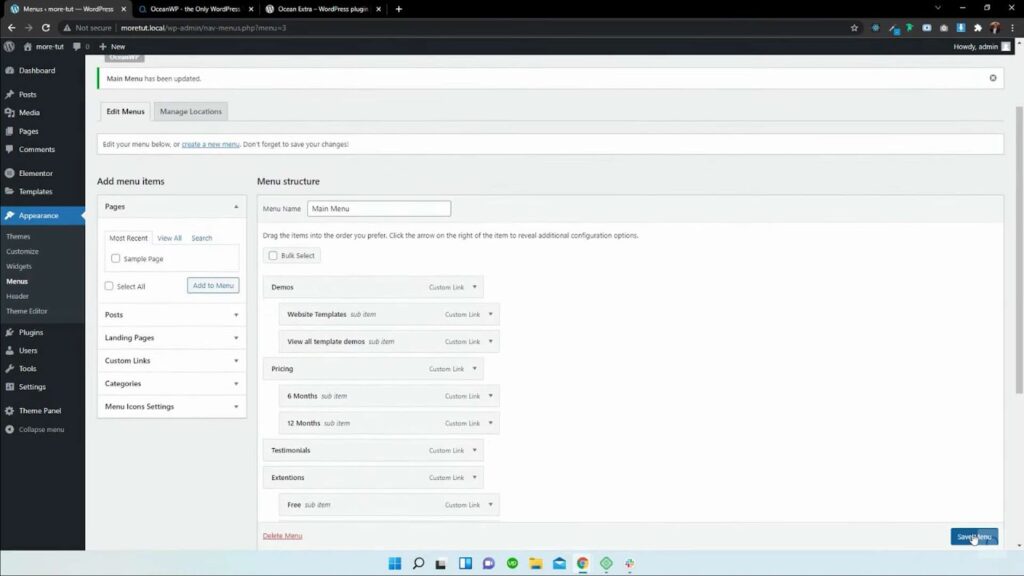
- Adjusting Menu Structure: To turn a regular menu item into a submenu item, gently drag the chosen item towards the right, just beneath its intended parent item. This slight rightward movement is key;
- Visual Confirmation: Once moved, the menu item should appear slightly indented compared to its parent, indicating its new status as a submenu item;
- Why Indent?: This indentation is a visual cue to WordPress, signaling that this item is now a child of the parent item, creating a cleaner and more organized menu structure.
Ensuring Menu Updates are Saved
After reorganizing the menu structure, securing these changes is crucial:
- Locate the Save Option: Find the “Save Menu” button, usually located at the bottom or top of the menu editor page;
- Committing Changes: Click the “Save Menu” button. This action is essential to ensure that all your adjustments are applied and retained;
- Importance of Saving: Neglecting this step could result in losing all the modifications made to the menu structure, requiring you to repeat the process.
Verifying the Menu on Your Live Site
The final step involves checking the functionality of your newly structured menu:
- Accessing Your Website: Visit the front-end of your website where the menu is displayed;
- Testing Functionality: Hover your cursor over the parent menu item. This should trigger the submenu to appear, typically in a dropdown format;
- Observation Points: Ensure that the submenu items are correctly aligned, easy to read, and appear only when the parent item is hovered over;
- Troubleshooting: If the submenu does not appear as expected, revisit the menu editor to adjust the indentation or check for any unsaved changes.
Incorporating these steps will greatly enhance your website’s navigation, making it more intuitive and user-friendly. Remember, a well-organized menu can significantly improve the overall user experience on your website.
Conclusion
Integrating submenus within your WordPress site is a seamless undertaking, poised to elevate the navigational prowess and overall user experience of your website. Through astute content categorization and the crafting of intuitive dropdown menus, you pave the way for your visitors to effortlessly access the information they seek. Whether your online presence takes the form of a petite blog or a sprawling e-commerce emporium, submenus stand as a potent instrument, adept at enhancing the navigability of your digital domain. Commence the integration of submenus today, ushering in a new era of user-friendliness and structural orderliness to your WordPress website.
Should this instructional piece have proven illuminating, do not hesitate to delve into an array of other WordPress tips and tutorials. Doing so promises to further bolster the functionality and aesthetic allure of your website.