WordPress stands as a robust content management system, bestowing you with the seamless capability to craft and oversee your website with ease. Nevertheless, as your website undergoes transformations, you might encounter the necessity to eradicate obsolete or superfluous pages. The act of erasing a page within the realm of WordPress is a fairly uncomplicated endeavor, yet it bears paramount significance to execute it with precision to ward off any inadvertent repercussions. Within this comprehensive tutorial, we shall escort you through the meticulous process of page deletion in WordPress, delineating each step meticulously.
Accessing the WordPress Management Interface
Initiating the Login Process
To initiate the management of your WordPress website, your initial course of action involves gaining access to the administrative zone. This can be accomplished by locating your website’s login portal. To achieve this, simply augment your site’s core URL with “/wp-admin” – for instance, “www.example.com/wp-admin.” This tailored URL will seamlessly usher you into the login interface, where you must diligently input your designated username and confidential password. It is imperative to underscore the significance of upholding secure login credentials as a vital precautionary measure against unauthorized intrusion.
Securing Your Login
- Use Strong Passwords: Opt for complex passwords that combine letters, numbers, and special characters;
- Consider Two-Factor Authentication: For added security, enable two-factor authentication if available;
- Regularly Update Credentials: Change your password periodically to enhance security.
Navigating to the Pages Module
Navigating the Dashboard
Once you’ve logged in successfully, you’ll find yourself in the WordPress dashboard—an essential hub for overseeing and controlling your website. Within this dashboard, you’ll encounter a multitude of choices and menus designed to facilitate the management of your site.
Locating the Pages Section
To effectively oversee the pages on your website, you can access the ‘Pages’ feature within the left-hand menu of your dashboard. Typically, it is situated alongside other fundamental navigation choices such as ‘Posts,’ ‘Media,’ and ‘Comments.’
Upon selecting the ‘Pages’ option, a comprehensive roster of all the pages within your website will be unveiled. Within this section, you are empowered to peruse, modify, append, or erase pages as per your requirements.
Tips for Efficient Page Management
- Organizing Pages: Consider categorizing pages for better management, especially if your website has a large number of pages;
- Regular Updates: Keep your pages updated with fresh content to engage visitors and improve SEO rankings;
- Preview Changes: Always preview changes before publishing to ensure that everything appears as intended.
Identifying the Page for Deletion
- Navigating the Pages List: Begin by exploring the list of your web pages. This list is a catalog of all the pages you’ve created. Carefully scroll through this collection to spot the specific page you intend to remove;
- Opening for Review: Upon finding the target page, click on its title. This action will lead you to an editing interface, allowing you a final review of the page’s contents;
- Verification Step: If there’s any uncertainty about which page needs deletion, use this opportunity to verify. Viewing the page’s content ensures you are making an informed decision, avoiding accidental deletion of important pages;
- Insight: Regularly reviewing your website’s content and removing outdated or irrelevant pages can significantly improve user experience and website performance.
Executing the Page Deletion
- Accessing the Edit Mode: Once inside the edit mode of the chosen page, your next task is to locate the deletion control;
- Finding the “Move to Trash” Option: This option is typically positioned within the right-hand sidebar, often nestled under a section labeled “Publish.”;
- Initiating Deletion: Click on the “Move to Trash” button to initiate the removal process. This action doesn’t permanently delete the page but rather moves it to a holding area (Trash), allowing for recovery if needed;
- Recommendation: Always double-check before deleting a page. Consider the impact of its removal on site navigation and SEO. Backup important content before deletion;
- Tip: Regularly clear your website’s trash folder to maintain optimal site efficiency and organization.
Finalizing the Deletion in WordPress
When you’re ready to delete a page in WordPress, the system will ask you to verify your choice. This extra step is designed to prevent you from accidentally removing important content. To proceed, you’ll need to click on either “OK” or “Move to Trash.” Here’s a quick guide to make sure everything goes smoothly:
- Alert Message: Pay attention to the alert message that appears. It’s there to ensure you’re making an informed decision;
- Confirmation Button: Look for and click on the “OK” or “Move to Trash” button. This action signifies your agreement to delete the page;
- Double Check: Before confirming, take a moment to ensure that you’re deleting the correct page.
Permanently Removing a Page from the Trash
After a page is deleted, it’s not gone forever – yet. It resides in the “Trash” folder, much like the recycle bin on a computer. This feature allows you to recover pages if you change your mind. However, if you’re certain about your decision, you can permanently erase the page. Here’s how to do it:
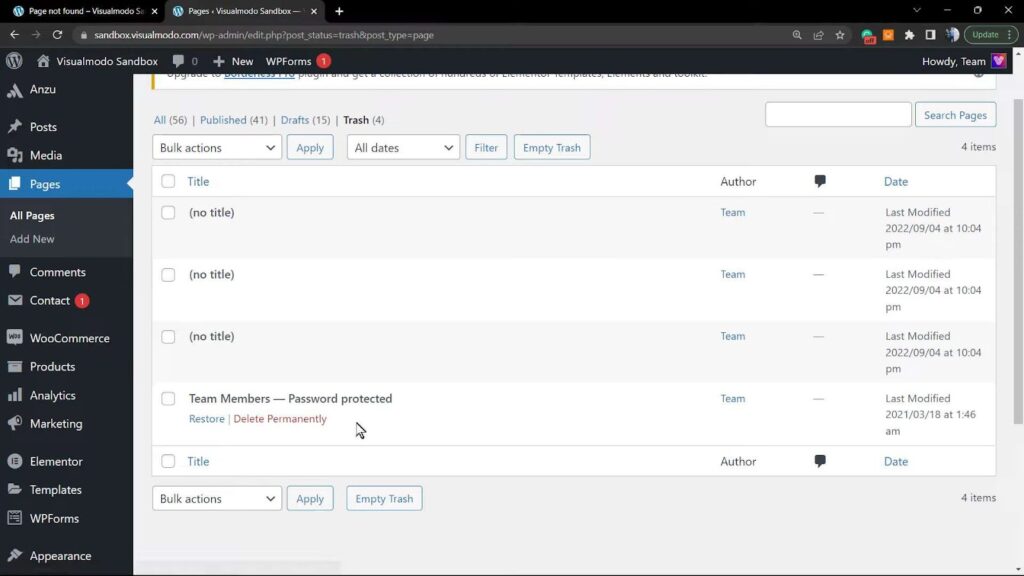
- Navigating to Trash: In your WordPress dashboard, select “Pages” and then click on “Trash.”;
- Selecting the Page: In the Trash, locate the page you want to delete forever;
- Final Deletion: Click on “Delete Permanently.” This action is irreversible, so be absolutely sure before proceeding.
Ensuring Complete Removal of the Page
The final step in this process is to confirm that the page has indeed been removed from your WordPress site. This verification is crucial to avoid any confusion or issues later on. Here’s what you need to do:
- Return to Pages List: Navigate back to the “Pages” section in your WordPress dashboard;
- Verification: Check the list of pages. The deleted page should no longer be visible;
- Search Function: Use the search feature to type in the name of the deleted page to double-check that it’s not just hidden or misplaced.
By following these detailed steps, you can confidently manage your WordPress site’s content, ensuring that pages are deleted only when you intend to, and verifying their removal to maintain an organized and efficient website. Also, unlock the power of website customization! Learn how to edit CSS in WordPress and transform your site’s style with ease.
Conclusion
Erasing a page within the WordPress platform proves to be a straightforward endeavor; however, it is of paramount importance to exercise due diligence and validate your actions to steer clear of inadvertent deletions. It is prudent to meticulously review the page slated for deletion and ponder whether you ought to safeguard the contents by creating a backup before definitively expunging it. By following this comprehensive, step-by-step manual, you will adeptly oversee your WordPress website, maintaining its tidiness and ensuring its up-to-dateness.
Should you require any further clarification or seek assistance regarding WordPress, do not hesitate to reach out to us. We extend our best wishes for the seamless management of your website!